13 Ekim 2012 Cumartesi

Karina's Gluten-Free Apple Crisp

To contact us Click HERE
PinitPrint Friendly and PDF
Karina's gluten-free apple crisp with quinoa flakes.
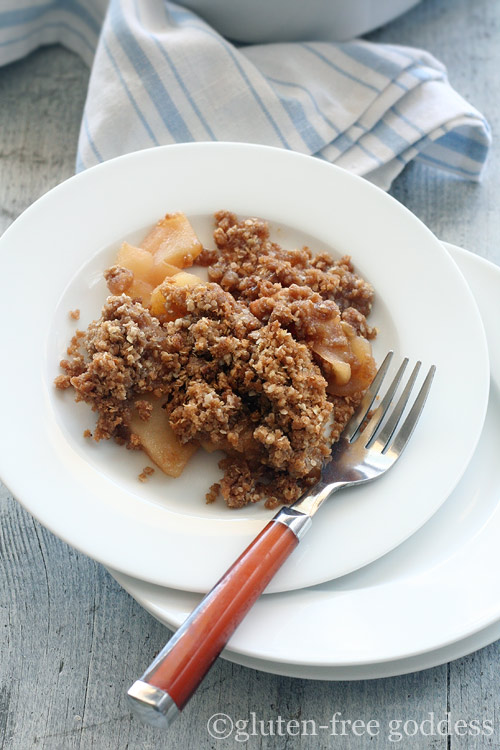
The best gluten-free apple crisp I've made. In this lifetime anyway.

I've been pondering identity lately. As in, am I the I writing this as Gluten-Free Goddess--- or am I a word-free, less defined kind of I that isn't actually I at all, but merely a spark in the collective energy source that is the great Mystery? Or Universe. Or Divine. Or whatever conceptual nomenclature you prefer.

Am I my thinking mind- or am I more of an essence, what we call soul, a truth beyond the assumed collection of thought patterns, personality traits, and personal history framed by a set of beliefs and separation known as the ego?

I do know I am not my disease.

One of the reasons I chose not to use the word celiac in my blog title was for just this very reason. I do not define myself as a celiac. In an identity sense. Yes, it says so on my medical records somewhere (in full disclosure, I think it actually says "possible sprue, resolved by the patient going gluten-free" because I couldn't afford an endoscopy). But I do not identify with my disease. That would be identifying with my gastro-functional limitations.

Hello, my name is Karina. And I have screwed up villi.

But I am not my screwed up villi. Just as I am not my post-cataract artificial lens implants. Or my salt and pepper hair that bristles like a squirrel on my prone-to-migraines head. I am also not my post-menopausal body that has brilliantly succumbed to a force superior than lunges and squats.

In the end gravity wins, I am sorry to tell you.

The older I get, I find less and less comfort in defining myself at all- never mind defining myself by my various bodily quirks (not to mention, my southerly migrating butt). I derive no solace in my mental quirks either. My beliefs, or assumptions or my random monkey thoughts. Even my skills are a poor capture of who I really am. I do not identify with how many paintings I've painted or sold, or how many likes I receive on Instagram. I do not crave recognition as a mirror. The promise of fame and fortune remains less than compelling.

I instead wander the hours of my days seeking answers that lead to more questions. Not answers that close the book. As in, subscribing to a system that has it all "figured out".

As Anne Lamott says, certainty is the opposite of faith.

Certainty is finite.

The end of growth. It clips the wings of possibility- the bigger truth that exists beyond my small understanding. Closing the book on the question of Who am I, exactly? would be foolish. The Big Mystery is far greater and more full of awesome than I can ever attempt to imagine. And whatever micro-teeny part I play in this infinite universal system called Life, I intuitively know one aspect of it, thanks to five-plus decades of living. Whatever It is, It is fluid. Everything changes. Including time. The past, present and future. The Universe (it's expanding, you know, faster than they first calculated). My experiential perception of myself (also expanding). The I that does not exist, because the I is only ego. The nattering, unreliable voice in my head.

So if this I does not exist--- who is craving this apple crisp?

Perhaps the only sensible response is this.

Be one with the apple crisp.

Now that I can do.


Gluten free apple crisp recipe
Quinoa flakes are the secret ingredient in this apple crisp.

Karina's Gluten-Free Apple Crisp Recipe

Ever since I started using quinoa cereal flakes in crisp and crumble toppings I've been dreaming of making an apple crisp. In the past I've used a pancake mix, or a blend of gluten-free flours to make a sugary topping. But quinoa flakes kick it up to a new level of flavor (not to mention, add a whole grain goodness to the endeavor). The texture is delightfully light. And the organic coconut oil gives it a buttery melt-in-your-mouth delicacy I haven't enjoyed since giving up moo-cow dairy.

Ingredients:

6 apples (Macintosh, Delicious, Pink Lady, Gala)
1 tablespoon lemon juice
2 tablespoons pure maple syrup
2 teaspoons tapioca or arrowroot starch
1 cup quinoa flakes
3/4 cup brown rice flour (or sorghum flour)
1 cup organic light brown sugar
2 teaspoons ground cinnamon
1 teaspoon ground ginger
1 teaspoon sea salt
3/4 cup organic coconut oil

Instructions:

Preheat the oven to 350ºF. Grease the bottom and sides of an 8x11-inch gratin or baking dish with vegan buttery spread. Set aside.

Peel and core the apples. Slice them and toss into a bowl. Sprinkle with lemon juice and toss to coat. Add the maple syrup and stir. Dust with tapioca starch and stir again to coat the slices. Pour the slices into the prepared baking dish.

In a mixing bowl, combine the quinoa flakes, brown rice flour, brown sugar, cinnamon, ginger, and sea salt and whisk to blend. Add the coconut oil in pieces and using a whisk or a pastry cutter, cut the coconut oil into the flour blend until you have an even, sandy mixture.

Spoon the mixture all over the top.

Bake in the center of a pre-heated oven for about 20 minutes. Cover the top loosely with a piece of foil and continue to bake for another 20 minutes or so (depends upon the size/type of apples), until the apples are fork tender and the sides of the crisp are bubbling. (The foil will help keep the topping from browning too much.)

Allow the crisp to cool before serving- though slightly warm it is luscious. We had leftover apple crisp the next day, chilled, right out of the fridge, and Darling it was fabulous cold, too. It tasted like apple pie.


Serves 8.

Baking time : 40 to 45 minutes.

Recipe Source: glutenfreegoddess.blogspot.com
All images & content are copyright protected, all rights reserved. Please do not use our images or content without prior permission. Thank you. 


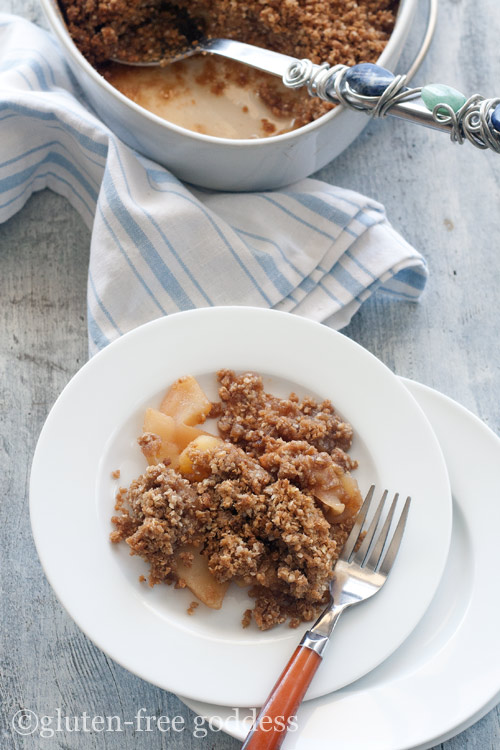
G-free apple crisp warm from the oven. It's also fabulous chilled.

Karina's Notes:


Quinoa flakes make this crisp and crumble topping light and delicate. If you cannot find quinoa cereal flakes (check your local market's hot cereal section) you can order them on-line. Yes, I suppose you could substitute rolled oats- but I find even gluten-free rolled oats rather tough to digest, and they make a heavier gluten-free apple crisp. Not nearly as lovely as using quinoa flakes.

I used brown rice flour and it was perfectly flavorful. You don't need starches- or xanthan gum- in this topping recipe. If you need to be rice free, I suggest sorghum flour.

To keep it completely starch free, omit the tapioca starch in the apple filling. I did, and it worked beautifully- though the juices would be thicker if you add the starch.

This fabulous recipe is gluten-free, dairy-free, corn-free, egg-free, soy-free, nut-free, and xanthan gum free. Holy tap dancing Goddess. That's a lot 'o free.

Enjoy sugary treats in moderation. Gluten-Free Goddess advises consuming no more than 2 tablespoons of sugar a day.


Karina's Gluten-Free Apple Crisp

Gluten-Free Chocolate Chip Cookies - New Recipe

To contact us Click HERE
PinitPrint Friendly and PDF
New gluten-free chocolate chip cookies - from the Gluten-Free Goddess
How do I say this? These new chocolate chip cookies are the best.

There are stirrings afoot here at Casa Allrich. Our gypsy boot heels are itching to wander yet again. Tugging at the threads of our daydreams. Stirring up old ghosts like some October trickster wind. Frayed old dreams folded neatly away and tucked quietly behind the stack of responsibility are getting aired out with a vengeance and enlivening discussions once again. That trip to the Cape got us thinking.

But before I speak too soon, there are chocolate chip cookies to ponder.

The subject of cookies is a favorite topic on Gluten-Free Goddess, and for good reason. I've written about cookies before- in posts too numerous to count.

So why are these different?

Why are these chocolate chip cookies blog worthy?

I will tell you darling.

Because they are golden and gently crisp on the outside, and soft and chewy within. Like the cookie you remember- that gorgeous, sweet caramel bite of homemade love. Warm from the oven these taste remarkable like the classic Toll House cookie recipe I baked a thousand times.

I credit the new flours and fat I used.

Gone is the brown rice flour. Gone is shortening. I've nixed the tapioca starch. And the result is a truly wonderful, soft dough that tastes closer to a real Toll House cookie than any other gluten-free chocolate chip cookies (though delicious!) I've baked.

So while we here at Casa Allrich discuss our future plans to ramble, bake up a batch of these- for your own road not taken.


New gluten-free chocolate chip cookies - from the Gluten-Free Goddess
Amy Bloom and cookies.
New gluten-free chocolate chip cookies - from the Gluten-Free Goddess
A gluten-free cookie you can offer guests with no apology.

Gluten-Free Chocolate Chip Cookies - A New Recipe

We've been baking gluten-free chocolate chip cookies for eleven years now. And we've tried all kinds of flours and various fats. These cookies have a soft, chewy center and a subtle golden brown sugar flavor. And they are dairy-free!

Ingredients:
1 cup sorghum flour
3/4 cup potato starch (not potato flour)
1/2 cup almond flour
1 teaspoon xanthan gum
1 teaspoon sea salt
1 teaspoon baking soda
1 1/2 cups light brown sugar
3/4 cup expeller-pressed organic canola oil
2 large organic free-range eggs, beaten
1 tablespoon bourbon vanilla extract
Rounded 1/2 cup vegan dark chocolate chips

Optional:
1/2 cup chopped walnuts

Instructions:

In a large mixing bowl, whisk together the sorghum flour, potato starch, almond flour, xanthan gum, sea salt, baking soda, and brown sugar.

Add in the oil, eggs and vanilla extract.

Beat the dough for two minutes, until it is sticky and smooth.

Add in the dark chocolate chips; and stir by hand to combine. Add in walnuts, if desired.

Note: If it is hot and humid, cover and chill the dough for one hour.

Preheat the oven to 350ºF. Line a baking sheet with parchment paper.

Form the dough into 28-30 balls. Place a dozen or so on the lined baking sheet and press down lightly- not too flat.

Bake for 14 minutes. The cookies will look golden- but still feel slightly soft to the touch. They crisp a bit as they cool.

Cool cookies on a wire rack.

Sensational warm from the oven.

Wrap cooled cookies by twos and freeze in freezer bags for future g-free treats. I place a small piece of parchment paper between cookies.

Warm thawed cookies briefly in a microwave for melty chocolate chips and a fresh-baked style soft center.

Makes 28 to 30 cookies.

Recipe Source: glutenfreegoddess.blogspot.com
All images & content are copyright protected, all rights reserved. Please do not use our images or content without prior permission. Thank you. 

Notes:

This particular gluten-free flour combo makes for a delightfully soft centered, chewy cookie. Not cakey. Not hard. Not brittle. Just right. I suspect that's because sorghum flour is softer than brown rice flour (which is a tad gritty). Potato starch also helps. It creates a softer baked good. Tapioca starch tends to be a little tougher.

The almond meal adds an oh-so-subtle texture and flavor to the dough. If you cannot use nut flours, I suggest trying millet flour. Or if you like buckwheat flour, you could try that. I'd stay away from rice flours in this recipe.

For the fat in this recipe, I experimented. Organic Canola oil baked up beautifully- with no greasy mouth feel.

For egg-free see my vegan chocolate chip cookie recipe- developed without eggs.

For health information on canola oil please see Mayo Clinic's canola oil article here.


Gluten-Free Chocolate Chip Cookies - New Recipe

Win a KitchenAid Mixer for Mother's Day!

To contact us Click HERE


Remember how I told you about an upcoming awesome giveaway that I would be participating in? Well, the time has finally arrived for your chance to win a KitchenAid mixer! Mommy and Me Giveaways, Frugal Experiments, Wahm Options, Mom To Bed By 8, Holy Cannoli Recipes and 23 other awesome blogs have teamed up to bring you an amazing giveaway for Mother's Day! We're giving away a KitchenAid Artisan 5-quart Stand Mixer! Winner will have a choice in color depending on prices on Amazon at the time the giveaway ends, valued at up to $300! The winner will get their prize in time for Mother's Day too!


Features of the KitchenAid Artisan 5-quart Stand Mixer (from the manufacturer):
The Artisan mixer's strong 325-watt motor delivers the power to handle the heaviest mixtures, and mix large batches easily.
The 5-quart polished stainless steel bowl with ergonomic handle is big enough to handle large batches of heavy mixtures. Its ergonomically designed handle is contoured to fit the hand and makes lifting the bowl more comfortable.
Unique Mixing Action The beater spins clockwise as the shaft spins counter clockwise; moving the beater to 67 different points around the bowl. This unique mixing action creates a thorough blend of ingredients and eliminates the need to rotate the bowl.
Multiple Speeds10 speeds allow the user to select the right speed for the mixing job; from very high to very slow stir. It's easy to select the precise speed needed for a perfect mix.
Versatile AccessoriesThe flat beater, dough hook, and the professional wire whip add to the versatility of the mixer. The flat beater is the ideal accessory for mixing normal to heavy batters. From cake mixes to firm cookie dough, the flat beater mixes quickly and thoroughly.
The dough hook mixes and kneads yeast dough, saving both time and the effort of hand-kneading. The wire whip incorporates the maximum amount of air in whipped mixtures for fluffier whipped cream and angel food cakes.
All attachments are solidly constructed, and attach easily to the stand mixer.
Easy Clean UpThe pouring shield fits around the top of the bowl and prevents ingredient splash-out. The chute makes it convenient and easy to add ingredients.
The tilt-back mixer head allows for easy access to bowl and beaters. A lock lever holds the mixer head securely in place and the bowl fastens tightly to the base.
Optional AttachmentsOptional attachments (sold separately) complete the package to make cooking a pleasure. From citrus juicer to sausage stuffer, KitchenAid stand mixers can handle just about any job in the kitchen.
Blogs participating:

One lucky US reader is going to win this KitchenAid Mixer in choice of color valued at up to $300! Giveaway ends May 7th at 11:59pm EST.


a Rafflecopter giveaway

Baileys Brownies w/ Baileys Frosting

To contact us Click HERE

I try not to make brownies to often since I could easily eat an entire batch in one sitting and not feel any guilt. I think the last time I had brownies was years ago. It is by far my favorite thing to eat. I mean, what's not to love? It's baked fudgey chocolatey goodness... who could resist that?!


I was at work talking to one of my friends and all of a sudden out of the blue I blurt out "I want brownies!". You can imagine that she gave me an odd look. But then when I said "Oooh Bailey's Brownies!!", she jumped on board with my train of thought. It wasn't to much later I was at home looking up recipes. Apparently, I'm not the only one that had the revelation that brownies and Baileys sounded like a good combo since there were a lot of recipes on the internet. I took two recipes that I found and combined them into one. What you have before you is Baileys Brownie Heaven.


Recipe adapted from Yummly and Lynn's Kitchen Adventures

  • 1 1/4 c. all-purpose flour
  • 1 tsp. baking powder
  • 1 tsp. salt
  • 2/3 c. unsweetened cocoa powder
  • 2 c. white sugar
  • 1 tsp vanilla
  • 1/4 c. Baileys Irish Cream
  • 1/2 c. unsweetened apple sauce
  • 2 eggs

Bailey's Frosting
  • 2 c. powdered sugar 
  • 1/2 c. softened butter 
  • 1/2 tsp. vanilla extract
  • 2 TBSP. Baileys Irish Cream
  • 2 1/2 tsp. milk

  1. Heat oven to 350 degrees. Grease bottom only of a 9x12 inch pan.
  2. BROWNIES: In a large bowl mix all of the dry ingredients. Add vanilla, Baileys, apple sauce and eggs. Beat 50 strokes with spoon. Spread into greased pan.
  3. Bake 22 to 25 minutes or until set. Do not over bake. Cool one hour or until completely cooled.
  4. FROSTING: In a small bowl beat 1/2 cup butter until light and fluffy. Beat in powdered sugar, vanilla, 2 tablespoons Baileys, and milk, adding enough milk for desired spreading consistency. Spread over cooled brownies. 


This post is submitted in
Just Another Meatless Monday
Made By You Monday

Slow Cooker Quinoa Chili

To contact us Click HERE

I know I've been missing for a while and the posts keep getting fewer and fewer but I think I've hit a blogging rut. With working and the desert heat, dinners have been a mix of grilled burgers, hot dogs, chicken, and any sort of quick throw together last minute meal, I've just been uninspired to cook. However, every once in a while I plan a slow cooker meal, which is where this one comes from. Well technically I got the recipe from Savvy Vegetarian.


This was perfect for us. It was incredibly hot here to where I didn't want to cook, clean or even think too hard. All you do is throw it together in your slow cooker before the heat sets in and voila, you have dinner without having to do much of anything. This is a super easy recipe. 


  • 1/2 cup uncooked quinoa
  • 3 cups water or bean cooking liquid
  • 1 1/2 cup cooked kidney beans (1 can, drained and rinsed)
  • 1 1/2 cup cooked black beans (1 can, drained and rinsed)
  • 1 cup unsalted tomato sauce OR: 1/4 cup unsalted tomato paste + 3/4 cup water
  • 1 Tbsp olive oil
  • 1/4 cup chopped onion
  • 1 Tbsp (2 - 3 cloves) minced garlic
  • 2 Tbsp minced jalapeño pepper
  • 1 green bell pepper, diced
  • 1 tsp cumin powder
  • 2 tsp gr coriander
  • 1 tsp paprika
  • 1 tsp dried basi
  • 1/2 tsp dried thyme
  • 1/2 tsp dried marjoram
  • 1/8 - 1/4 tsp chipotle pepper powder
  • 1 bay leaf
  • 1 Tbsp light molasses
  • 1 Tbsp soy sauce
  • 1/4 cup chopped cilantro (optional)
  • Fresh ground black pepper to taste

  1. Sauté jalapeno, garlic, and peppers in oil for 5 minutes on med-high
  2. Add spices and herbs, stir 2 minutes
  3. Combine with water, tomato sauce, salt, quinoa and beans in a 6 qt slow cooker.
  4. Cover and cook on low for 5 - 6 hours
  5. Add soy sauce, molasses, pepper
  6. Serve garnished with chopped cilantro and sour cream (optional)

This post is submitted in
Just Another Meatless Monday
My Meatless Monday 

12 Ekim 2012 Cuma

Peanut Butter Iced Coffee

To contact us Click HERE


Sometimes a recipe sneaks up on you that makes you think, "How did I not think of that myself?" This is such a recipe. I came across it while cruisin' pinterest and knew I had to have it... like immediately. So I went in the kitchen and got to work whipping up this delicious cold, frothy drink. Which in my opinion could outdo one of those fancy $4 coffee drinks any day.


This recipe comes from Sarah over at Baking Serendipity. She used vanilla almond milk which I don't drink. I get the original plain flavor which isn't as sweet or have a vanilla flavor to it. To balance it out I had to add more sugar than I probably would have if I'd used the sweeter vanilla almond milk. Regardless though, I don't think it made that much of a difference. You could even use regular cows milk. Almond milk just adds a little bit of extra nuttiness to the flavor but not enough that if you used plain milk it would drastically change the end result. Besides, with the peanut butter you put in, your wouldn't notice you were missing almond milk.


  • 1 1/2 c. black coffee, cold
  • 1/2 c. almond milk or regular milk
  • 1 TBSP peanut butter
  • sugar/sweetener, to taste

  • Combine coffee, milk and peanut butter in a blender. Blend until smooth. Stir in sweetener and serve immediately. 

This post is submitted in
My Meatless Monday

Upcoming Giveaway for a Keurig!

To contact us Click HERE


The American Family Keurig Event is hosted by Mom Powered Media.


Prize: Keurig V700 Vue Brewer

The event dates: 10/8 - 10/29


That's right! I've decided to sign up for another fun giveaway! I've always wanted one of these guys and pretty soon you guys will get the chance to win one! Only a week an a half until this giveaway goes live!


Free Event ~ Sign-Up Here – Bloggers Wanted American Family Event

Shakshouka

To contact us Click HERE


Let me just start out by saying that I think this is my favorite egg dish. Which is strange since I don't like eggs. There's just something about the taste of them lately that's really been throwing me off. Maybe it's the heat of the desert or maybe I just grew out of eggs? But for some reason when I came across this recipe on The Family Kitchen, I quickly bookmarked it so that I could make it. And let me tell you, it tastes as good as it looks! So good, that as I type up this post, I'm eating it... again!


I followed the recipe, except for the parsley. I thought the recipe called for cilantro when I picked up the ingredients at the store. I figured, poblanos, tomatoes, eggs... cilantro! HaHa. I must say that cilantro works wonderfully with this dish. This recipe is uber simple to make. I made the sauce ahead of time and when the Mr. finally got home from work, I reheated it up, plopped in the eggs and within a matter of minutes, dinner was done! I must say that I love the flavors. I also toasted up slices of Italian bread to do along with it.


  • 3 poblano, anaheim, or sweet red or yellow peppers
  • 2 tablespoons olive oil
  • 1 red onion diced
  • 1 quart crushed tomatoes
  • splash of red wine vinegar
  • 1 tablespoon paprika
  • 1/2 teaspoon ground cumin
  • 1/4 teaspoon ground coriander
  • big pinch red pepper flakes
  • salt and pepper to taste
  • 6 eggs
  • 4 tablespoons creamy goat cheese
  • fresh cilantro for garnish

  1. Roast the peppers over an open flame until the skin is blackened all over. Remove them from heat and close them in a paper bag so they can steam for 10 minutes. Take them out of the bag and pull off the skin under cold running water. Remove the stem and seeds and dice.
  2.  In a deep 9” inch skillet, heat the olive oil over medium-high heat. Saute the onions for 5 minutes and then add the peppers and saute for another 3. Add the spices, salt and pepper, and cook for another minute. Then pour in the tomatoes and the red wine vinegar. Let the sauce simmer for 10 minutes until it has thickened a bit. Check the salt and acid levels.
  3. To add the eggs, crack each one into a small, shallow bowl and slide them into the tomato sauce one at a time. Cover the shakshuka and cook for 3 minutes, add the goat cheese in several dollops, and re-cover the skillet and continue cooking another 3 minutes. Spoon the shakshouka into bowls over big slices of toasted bread, and garnish with chopped cilantro.
*You can always make the sauce ahead of time and just reheat the sauce in a pan to continue with the recipe.

 
This post is submitted in 
Newlywed Recipe Linky 

Review: Kettle Brand 30th Birthday Limited Batch Flavors

To contact us Click HERE
If you follow me on Facebook, then you probably saw the post that I was one of 5,000 people who won the chance to get a sneak peak at Kettle Brand's Limited Batch potato chips in celebration of their 30th birthday. They brought back 4 flavors that they had previously been retired and after tasting them... I cannot, for the life of me, figure out why they retired them in the first place. They could out trump the classics, in my personal opinion.

*Now I supposed I must put a disclaimer.... we love Kettle Brand chips. They are crunchy, not overly oily and always have great flavor. This is pretty much the only brand of chips we buy. So my review will be based off of the flavors.


Beer Cheddar- After debuting as a fan pick during the brand’s first People’s Choice vote in 2005, this flavor earned a cult following. A combination of tangy sharp cheese with malty beer notes forms a perfect balance of smooth and salty flavors.


My thoughts: Sorry there is no photo. The Mr. ripped open the bag and scarfed them down before I could get a picture. However, I did try a few chips and I must say that I'm not a fan of this flavor. I don't like the smell or taste of beer and this definitely have a creamy beer finish to it.  However, to those who like beer, you'd probably enjoy this chip.


 Red chili- Introduced in 1982, this flavor mirrors the taste of sriracha sauce combined with a vinegar tang and Cayenne pepper for a searing red chili heat. While it may have launched ahead of its time, this chip is making an on-trend comeback with the flavors and foods of today.


 My thoughts: This was really good. There was a pepper taste to it but not a lot of heat. The heat index was very mild.


Jalapeno Jack- Originally debuted in 1989, this flavor not only has a visual resemblance to a slice of Pepper Jack cheese, but has the same creamy, salty Jack cheese base mixed with the spice of red and green peppers and a strong jalapeño flavor.


My thoughts: My favorite of the bunch. It had a kick at the end with a light dusting of cheese on them. This was the bag that the Mr. knew not to touch.


Salsa- First launched in 1999, vocal fans have long mourned this favorite’s absence. Tomatoes, bell peppers, onions and garlic blend with the bright flavor of lime to create an unmatched combination that’s sweet, smoky and salty.


My thoughts: This is a great chip for everyone. You can taste all of the seasonings like onion, tomato and peppers. It definitely has a salsa taste to it and doesn't have any heat to it at all. 


These flavors are only available for a limited time, and similar to a Disney movie, once their time is up, they will be off shelves and you will be unable to buy a bag. Hopefully the good folks at Kettle Brand decide to bring these flavors back more often because now that I've had a taste... I will never be able to look at my once favorite BBQ chips the same.

Can't find Kettle Brand potato chips in your area? You can always go to their website and order them!


Discription of the flavors came from Reuters

Giveaway: Keurig VUE V700

To contact us Click HERE

 
 When I saw the call for bloggers needed to sign up for this awesome giveaway, there was no way I could not sign up. I've always wanted one of these machines and I wanted to be able to bring the giveaway to my readers. So without further ado, I present this awesome giveaway that is hosted by Mom to Bed by 8, Powered by Mom, Real Mom Reviews & Baby Cost Cutters and co-hosted by Moms Living Thrifty , For Him and My Family, Chant3llo's Blog, A Night Owl, Coupon Pro Blog, 1 Hour Giveaways & ABC Laughs


About the Keurig Vue V700 {$229 Retail Value}

The Keurig® Vue® V700 Brewing System gives you total control to brew your way: stronger, bigger, hotter and with more choices than ever before. With an interactive Touchscreen and revolutionary new Custom Brew Technology™ Vue® ensures every beverage is brewed to perfection, giving you perfect results – every cup, every time. 8 brew sizes, removable 74oz water reservoir and your choices are nearly limitless. In addition to coffee, tea, hot cocoa and iced beverages, Vue® brews delicious café and specialty beverages as well. This product is BPA free. Now you can fully customize your cup of coffee, tea, hot cocoa, iced beverage, specialty or café beverage to brew what you love, the way you love it – every time!


Now for the fun! Go and enter the giveaway on the rafflecopter below for this awesome Keurig Vue V700 brewing system for the chance to enjoy some warm and toasty moments compliments of this prize. Please remember to only claim the entries you’ve actually followed through on as we will verify entries. Anyone who claims entries they did not follow through on will have all entries disqualified and may be disqualified from future events. Thanks for keeping it fair for everyone! Open to US residents 18 years of age and over only.

US Only
a Rafflecopter giveaway

It’s free to join American Family and if you sign up to join them through this event you will also receive a free e-book filled with Fall Harvest recipes to complement your coffee with your new Keurig!
*EARN BONUS POINTS FOR THE GIVEAWAY just for signing up for the the awesome e-book! 

Holy Cannoli Recipes is not responsible for the prize delivery and has not received compensation for the post.
Prize Sponsored by American Family

11 Ekim 2012 Perşembe

Goin' Gold

To contact us Click HERE
This polish post is dedicated to Goin' Gold - September is Childhood Cancer Awareness Month  Elizabeth Struk was kind enough to ask if I would participate in this project. Fellow YouTubers and Bloggers are taking part by doing a video or blog post showcasing the color Gold. If you would like to make your own contribution using the color gold in some way, please do so. The more awareness we can bring, the better! Feel free to link yours in the comment section below. You can find more information on the subject by visiting the Goin' Gold Facebook Page, watch other videos on their YouTube Channel, and follow them on Twitter.  
I thought the name of this polish was appropriate for this post. This is a gold metallic with a hint of bronze. It did take three coats to get the color you see below. Like the other L'Oreal polishes I've reviewed, it applies nicely without streaking.
Because You're Worth It - L'Oreal


Pin It